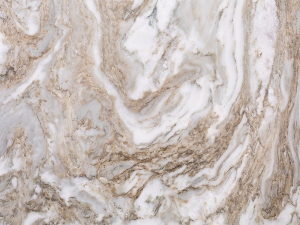
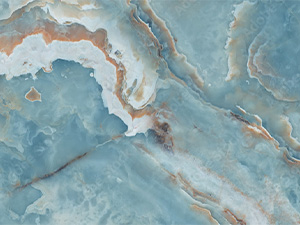
How to Remove Ring-Shaped Marks on Marble

How to Remove Ring-Shaped Marks on Marble

Here is a question people commonly ask us: “What causes ring-shaped marks and white spots on marble?” Questions like these usually follow: “Is there a product I can use to get rid of this type of stain?” and “Is there a sealer I can apply to restore the shine and prevent this problem?” Sometimes people believe that when surface damage happens, it means they will need to replace their marble. Let’s unpack these concepts.

The Cause of Ring-Shaped Marks and White Spots on Marble

Some people refer to ring-shaped marks on marble as “water rings.” These marks and spots on marble are likely not stains, but acid etch damage. If the discoloration is lighter than the stone, it is an etch, not a stain. Marble contains calcium carbonate, a substance that chemically reacts with acids in certain types of food and drinks, and this is what causes acid etch damage on marble surfaces.

Product for DIY Etch Removal

A high quality marble polishing powder can be used to remove etch marks from polished marble, as long as the damage is not too severe. Run your finger over the area you intend to treat. If it feels smooth and has no rough texture compared to the surrounding finish, then you can use the polishing powder and a clean white cloth to remove the spots. Note: Marble polishing powder should not be used on marble with a honed / satin-matte finish. Although it will remove mild etch damage, it will also change that area to a polished finish that is inconsistent with the surrounding honed finish. If the etch damage is too severe to handle on your own or your marble has a honed finish, professional stone restoration services can give your marble a like-new finish.

What Sealers Can and Can’t Do

A common misconception is that the impregnating sealers commonly applied to marble countertops can prevents stains and etch damage and restore the shine. If sealing is recommended for your stone, it will simply buy some time to wipe up spills before they become stains, and it should only be applied by your professional stone restoration technician. When impregnating sealer is applied to marble, the appearance of the finish does not change at all. For complete stain and etch protection, as well as elegant finish options, etch protection treatments and protective films are ideal solutions. Unlike impregnating sealers that penetrate into the stone, protection treatments and films form a barrier between marble and acidic substances.

Don’t Replace Your Marble

Replacing etch damaged marble would be costly and completely unnecessary. Use a marble polishing powder to remove etch damage or have it professionally restored. For more information about marble care or stain management, download our free Stone and Tile Care Guide and use our Stain App under the Resources tab on this site. Contact us for specific product recommendations, answers to questions about your marble, or to schedule services.


This article is one of a series of articles written and published on behalf of Surface Care PROS Partners.

How to Remove Shower Calcium Deposits

How to Remove Shower Calcium Deposits

Do you have a white film or scaly buildup on your tile or stone shower? This is caused by calcium deposits, which can be difficult to remove. Here are some DIY solutions you can try yourself before you reach out for professional services.

Why Calcium Deposits Are Usually Found in Showers

Water with a high mineral content can deposit calcium carbonate on your natural stone or tile surfaces. Over time, these deposits build up.

Natural stone and tile applications that get no or minimal water exposure rarely ever get calcium deposits. Examples include entryway walls, fireplace surrounds, damp-mopped floors, and areas of countertops that get little use. However, surfaces that are constantly being wiped may slowly, over a long period of time, become cloudy looking with calcium deposits. Examples include high-use countertop areas (usually near sinks), commercial bar tops, and restaurant table tops.

Bathroom showers are the major problem area for calcium deposits. Every time someone showers, the surfaces are exposed to an average of two gallons of water per minute!

Be Careful

The challenge in removing calcium deposits is avoiding damage to the surface. If you have porcelain or ceramic tile, you can use harsher cleaners than those that can be used on natural stone. You might be able to get away with using mildly acidic cleaners on silicate-based stones, such as granite, sandstone, slate, and quartzite, but if you have calcium-based natural stone, your options are limited. Polished stone may be more likely to require professional refinishing after DIY calcium deposit removal methods than honed stone.

Solutions to Remove Calcium Deposits

The following are DIY suggestions for removing calcium deposits from your natural stone or tile surfaces. WARNING: As alluded to previously, some DIY methods can cause dullness or etch damage to natural stone. You may want to reach out to your stone restoration technician before proceeding.

  1. Use a plastic putty knife to scrape off the excess buildup. Be sure not to use a metal knife, as it can leave marks or scratches.
  2. Saturate the surface with the appropriate cleaner. Allow enough dwell time to soften the buildup. Clean using a white cloth or soft nylon brush.
  3. For tile or stone, rinse thoroughly to remove any cleaning residue. For stone, especially if you used sulfamic acid, follow up with a pH-neutral cleaner prior to the final rinse.

Porcelain or Ceramic Tile

The glazed finish on porcelain and ceramic tiles cannot be ruined with most acidic cleaners, such as lemon juice, white vinegar, soap film remover, and other acid-based cleaners. The exception is hydrofluoric acid. Avoid heavy duty acids, such as HCL and CLR, which pose numerous health risks. If necessary, you may also use a green scrubbing pad on porcelain or ceramic.

Marble and Other Calcium-Based Stone

Stone-safe, pH-neutral cleaners can be used on both polished and honed natural stone. Do not use a green scrubbing pad on polished stone. You might be able to get away with using it on stone with a honed finish, but do so at your own risk knowing that some honed finishes have a higher polish than others. If the desired results are not achieved, use a heavy-duty, non-acidic soap film remover.

Granite and Other Silicate-Based Stone

For granite and other silicate-based stone, use the same methods as mentioned above for marble and other calcium-based stone. If the desired results are not achieved, use sulfamic acid (not to be confused with sulfuric acid), available at home improvement centers.

Professional Cleaning and Restoration May Be Necessary

DIY methods are valuable for regular cleaning and in some cases, more intensive cleaning, but professional stone and tile services achieve dramatic results that cannot be achieved using DIY methods. If you choose to try DIY methods first, feel free to contact us for specific product recommendations. If DIY methods fail to produce the desired results or leave your stone looking dull, we are here for you. Perhaps reading this article makes you realize you have better things to do than spending hours cleaning your shower. Contact us if you would like to schedule professional calcium buildup removal services.

QUARTZITE. QUARTZ. WHAT’S THE DIFFERENCE?

Pinterest, Houzz, magazines, and other kitchen and bath design resources recommend both quartzite and quartz for kitchen countertops, floors, walls, backsplashes, and more. Sometimes people confuse the two materials, given their similar names and appearances, but they are actually very different.

Quartzite

Quartzite is a natural stone. Sandstone that is subjected to heat and pressure forms quartzite. Quartzite’s appearance can be veined like marble, have more solid coloring, look like crushed crystals, or a combination of these features. On the Mohs scale of hardness, quartzite is usually around a seven or eight out of ten, which means it is harder than glass.

Quartzite is also very durable, but subject to staining or etching like most natural stones. Since quartzite is porous, sealing it can help inhibit staining, but sealers cannot prevent etching. There are new solutions now available on the market for quartzite countertop etch protection. Maintenance requirements include frequent cleaning with a stone-safe, pH-neutral cleaner and periodic professional restoration services, which may include honing, polishing, cleaning, and re-sealing.

Quartz

Quartz is a mineral, and in its powdered form, it is the main ingredient for the engineered stone also called quartz. With patterns mimicking marble and other natural stone, quartz requires less maintenance than natural stone. Quartz does not require sealer, because it is not porous, but this doesn’t necessarily mean it is impervious to damage. The good news is that quartz does not damage easily. The bad news is that although quartz is harder to damage than quartzite, once it is damaged, it is more problematic to restore because it is made with colored resin.

Feel free to contact us with specific questions about quartzite, quartz, or other materials.


This article is one of a series of articles written and published on behalf of Surface Care PROS Partners.

Are Steam Cleaners Safe For Natural Stone?

Are Steam Cleaners Safe For Natural Stone?

There are many wrong ways to clean natural stone, which is why we recommend leaving heavy cleaning to an experienced stone restoration professional. As you will see in the following article from Fred M. Hueston, Chief Technical Director for Surface Care and natural stone troubleshooting expert, steam cleaning should be used with care and sparingly, or better yet, not at all…

I am often asked, “Can I use a steam cleaner on my natural stone floors?” Steam cleaning is a very effective way to remove soil and containments without harsh chemicals. However, on marble, granite, and other natural stone, steam cleaning can be harmful. Steam causes thermal expansion and contraction of the stone. This heating and cooling process can create all sorts of problems.

Spalling

Steam cleaning can cause a condition known as spalling. Since most stone is porous, the high temperature of steam cleaning can cause pressure within the stone, which can lead to pitting and/or flaking of the surface of the stone.

Sealer Removal

Natural stone sealers inhibit staining. Impregnating sealers penetrate the surface of the stone. Color enhancing impregnating sealers intensify the colors in natural stone. Topical sealers form a strippable or permanent coating that covers the surface of stone. If natural stone is sealed, steam cleaning can remove the sealer.

Accelerated Crack Damage

As natural stone is fabricated, transported, and installed, stress on the material can cause cracks to form. Stone may also be cracked after installation because of accidental damage or environmental stresses. If natural stone has any cracks, the heat and pressure from a steam cleaner can cause the cracks to expand and open up, making the cracks more obvious and problematic.

Grout Damage

Grout can also be negatively impacted by continuous use of steam cleaning. Damage may include discoloration and the grout cracking and falling apart. Steam cleaning may also remove sealers that were applied to the grout.

Iron Oxidation

If the composition of your natural stone includes iron, steam cleaning poses a risk of discoloration. Moisture reacts with the iron, creating rust-like stains on and in the stone. Iron oxidation discoloration can be extremely difficult or even impossible to remove.

Filler Damage

If your stone has fillers (travertine, for example), steam cleaning can cause the fillers to pop loose and fall out.

Residential vs Commercial Steam Cleaners

Home-type steam cleaners may be safe to sparingly use on natural stone, since these steam cleaners do not reach the same high temperatures as commercial steam cleaners. The maximum temperature of residential steam cleaners is about 250 degrees F, whereas commercial steam cleaners can reach temperature of over 300 degrees F. However, even home-type steam cleaners should not be used often. Steam cleaning every few days, or even every week or two can result in damage. At most, you could use a lower temperature mop-style steam cleaner a few times per year.

Types of Steam Cleaners

There are several types of steam cleaners.

Vapor steam cleaners look like a canister vacuum. They emit a fog of steam vapor to the surface with a wand. The temperature can reach over 200 degrees F.
Steam mops inject steam into a cloth mop. Generally these are safer to use on natural stone than other types of steam cleaners, since the temperature is lower.
Handheld steam cleaners are simple to use and are good for spot cleanup. Using them on stone countertops or shower walls can result in the same type of damage as steam cleaners used on natural stone floors.

To be on the safe side, my recommendation is that you use a pH-neutral, stone-safe cleaner for routine cleaning of your natural stone, and ask your stone restoration professional to take care of any intensive cleaning, as needed.


This article is one of a series of articles written and published on behalf of Surface Care PROS Partners.

Tips for Hiring a Stone Restoration Contractor

Over a period of time natural stone can become abraded, etched, scratched, or otherwise damaged, depending on its use. A fully trained and qualified stone restoration contractor will offer the following services.

  • Grinding—Removes deep scratches and lippage (uneven tile edges)
  • Seam Polishing— Visible seams are filled and mechanically polished to virtually disappear
  • Honing—Remove minor scratches and wear
  • Polishing—Gives marble or natural stone the desired sheen, protects the surface from everyday traffic and spills
  • Alter a Finish—Change a stone’s finish, for example, from honed to polished finish and vice versa
  • Cleaning—Removes dirt, stains, bacteria and also removes waxes and polymers that have become embedded
  • Sealing—Reduces staining
  • Color Enhancing—Penetrating sealers / impregnators enhance or enrich the color of your stone
  • Crack and Chip Repair—Fills cracks and chips in both marble and granite
  • Fill Pits and Blemishes—Fills limestone and travertine imperfections
  • Stripping—Removes coatings that can block a stone’s ability to breathe
  • Grout Cleaning and Sealing—Removal of deep contaminants in grout, then sealing for protection and easier maintenance

Interview Questions 

Here is a list of questions you should ask when interviewing the potential restoration contractor to whom you will entrust your natural stone. A qualified professional understands the leap of faith you are taking in hiring them and should neither balk at, nor be offended by any of the following questions. If they seem more interested in quickly securing the contract than in setting your mind at ease regarding their competence and qualifications, think carefully about whether they are the right one for the job.

What training have you had?

When hiring any contractor the more informed you are about the service you need, the better off you are. As with any profession the proper training is extremely important. You do not want to leave your natural stone in the hands of an improperly trained contractor. A properly trained company has received hands-on training in these application processes. Be sure to ask any prospective contractor about their training and certification.

Are you insured?

Ask for proof. Have him show you a certificate of insurance, or, if the job is large enough, have his insurance company send you one. Be sure he carries liability and workers’ compensation insurance.  Any reputable company will carry both.

Do you carry workers compensation insurance?

Workers Compensation Insurance protects you from liability if a worker is injured while on your property. Be aware that if the contractor does not carry workers compensation coverage, you will be liable for any injuries suffered by the contractor or any of his employees on your property. If the contractor is a one-man operation, he can be exempt from having to carry workers compensation insurance. Ask him to show you his certificate of exemption from workers compensation. This is very risky for you though. If he shows up with a helper and the helper gets hurt, with no workers compensation insurance, you may have to pay the medical bills. If the uninsured contractor is sloppy about verifying his sub-contractor’s workers compensation insurance and the sub-contractor gets hurt, again you may have to pay the medical bills.

Can you supply me with a list of references?

Ask for references—and check them.  Many contractors in all fields have references, but you’d be surprised how rarely they are actually checked.  Call at least two and ask if the contractor did a good job. Were there any problems and, if so, did he correct them? Were his employees professional? Were the surrounding areas carefully protected?

What professional organizations are you a member of?

Well established companies are affiliated with professional organizations.  For the stone and tile industry, it might be Surface Care PROSS or The Marble Institute of America, among others. In all cases, these organizations only attract conscientious contractors interested in bettering the industry and in weeding out unprofessional contractors. In order to become a member, the contractor’s background and references are thoroughly investigated. While a new contractor may not be a member of any professional organizations, it is highly unlikely an established contractor would not be a member of at least one, unless there is a reason that he cannot join.

What are the risks? While the risks may be minor, there are contractors that just don’t belong to any professional organizations, they are the rare exception and the vast majority of substantial companies do belong, because they understand the benefits of continuing education and peer review.

What are your work practices?

It can’t be stressed enough how important this information can be to you! Ask questions such as, how do they perform their work? What time do they start? How will they protect your carpets and surrounding cabinetry, etc.? How will the trash and debris be handled? The answers to these questions will give you a clear picture what type of contractor you are dealing with.

Contracts

Is their contract simple and straight-forward? Simple doesn’t mean it is right, and complicated doesn’t mean it is wrong, but the bottom line is: if you can’t understand it, or it is too complicated, make sure to get a clear understanding ― in writing!

Don’t hesitate to trust your gut feeling ― are you comfortable with the contractor? This is much more important than you might think!


This article is one of a series of articles written and published on behalf of Surface Care PROS Partners.

Can Skin Soap Damage Natural Stone?

Can Skin Soap Damage Natural Stone?

If you have marble or other natural stone shower walls or tub surrounds, the skin soap you use can damage, stain, or diminish the appearance of your stone, especially if your stone is porous or calcium-based. With an abundance of skin cleaning products on the market, from bars and scrubs to foams and gels, knowing which ones to avoid using around your natural stone can be tricky. This article provides the details you need.

The Safest Soaps Are pH Neutral

The pH scale is a range of 0 to 14 to describe how acidic or basic, or alkaline a substance is. When something is pH-neutral, it is 7 on the pH scale. Soaps that are less than 7 are acidic. Soaps that are greater than 7 are alkaline. The safest soaps for both human skin and natural stone are pH-neutral, and do not contain detergents (synthetic cleaners), surfactants (surface active agents), dyes, fragrances, sulfates, and other additives.

What is soap, anyhow? According to the U.S. Food and Drug Administration,

Ordinary soap is made by combining fats or oils and an alkali, such as lye. The fats and oils, which may be from animal, vegetable, or mineral sources, are degraded into free fatty acids, which then combine with the alkali to form crude soap. The lye reacts with the oils, turning what starts out as liquid into blocks of soap. When made properly, no lye remains in the finished product.

The easiest way to determine whether your skin soap is ordinary, pH-neutral soap is to purchase skin soap specifically marked on the label as pH-neutral. You may also purchase a digital pH meter or litmus paper to test soap.

Acidic Soaps Can Cause Etch Damage

One of the most widely recognized acid etch marks is what many people refer to as “water marks” on a kitchen countertop, because when acidic drink spills go unnoticed a little too long, the etch damage left behind can have the same circular shape as that of condensation left behind from a glass. Acidic soaps used for cleaning your skin can cause the same type of damage in the shower as in the kitchen.

Acids in skin soap chemically react with calcite or other minerals in the stone that are sensitive to acid, causing a white discoloration and roughening the surface of the stone. This damage cannot be wiped or washed away using regular cleaning methods. Your professional stone restoration technician may attempt to remove very mild etching with a polishing powder. Deep etch removal, however, will require honing and polishing.

Basic (Alkaline) Soaps Can Cause Etch Damage

One of the most widely recognized alkaline etch marks is a white spot on glass after going through a dishwasher with an inadequate rinse cycle. Similarly, regular use of soaps with a high alkaline content can etch the finish of your natural stone.

Alkaline etch damage cannot simply be wiped or cleaned away. Your professional stone restoration technician may attempt to remove alkaline etch damage with a mild acid, but since acid can also cause etch damage, chances are your stone will need to be honed and polished.

Soap Dyes or Fats Can Stain or Discolor Natural Stone

Some soaps contain dyes or colorants to give the product a more attractive appearance. If stone is porous, it can absorb dyes, especially blue, green, or turquoise dyes, causing the surface to darken or become discolored.

Some soaps are made from a high fat source, like coconut oil. An abundance of this ingredient can, over the course of time, act like a natural color-enhancing or darkening agent.

If a small area of your stone is stained, poulticing can draw the discoloration out of the stone. Visit our Stain Management App under the Resources tab for poultice ingredients and instructions, including a how-to video. If discolorations or stains persist or if they cover a large area, your professional stone restoration technician may be able to use a combination of honing, polishing, sealing, and enhancing to mask or diminish the problem to your satisfaction.

Soap Scum Can Diminish the Appearance of Stone

When minerals in your water interact with soap residues and surfactants, a thin film of soap scum can form on your stone. The best way to prevent this is to keep the shower clean. Use a squeegee to wipe your stone down after a shower, and clean your stone once per week with stone-safe, neutral cleaner.

Feel free to contact us regarding any specific questions or concerns you may have about your soap and your stone. To protect the finish of your natural stone shower walls or tub surrounds purchase soap that is safe for natural stone. Your skin may thank you, as well.


This article is one of a series of articles written and published on behalf of Surface Care PROS Partners.

Glossary of Natural Stone Finishes

Let’s Talk About Natural Stone Finishes

Natural stone comes finished in many ways. It doesn’t start that way from the quarry and it doesn’t always have to stay the way it is after it is installed.

The appearance of all natural stone is rough when it is first quarried. The surface is then altered to any number of finishes. (The name of the finish often explains how the finish is produced.) When selecting stone, understanding your options will help you to choose the best finish for the look you are going for and for your intended use.

Fabricators and stone suppliers almost always purchase stone that is already finished, so when you purchase new stone for an installation, the finish you see is the finish you get. Most of the time.

Professional stone refinishing can often alter the finish of stone using various methods, even after it is installed.

With this in mind, the following glossary of finishes will help you understand natural stone finishes, which ones are best for various purposes, and what options you have to change certain finishes.

Your Finish Options

Following is an overview of the most popular finishes, how they are achieved, and where they are most appropriate.

Polished

Natural stone with a polished finish has a glossy, mirror-like quality that showcases the colors, veining, and other unique characteristics of natural stone. If your highest concern is that the stone has an elegant appearance, a polished finish is a good choice. A polish can be achieved by using a specialized abrasive technique. Diamond-infused pads mounted on a machine rub against the stone, similar to sandpaper on wood. Industry professionals describe this process as honing and polishing. Progressively finer grit pads are used until a highly reflective polish is achieved. Polished finishes may not be slip resistant and are most appropriate where a slip and fall hazard is not a concern.

Honed, Satin, or Matte

Natural stone with a honed finish is softer and velvetier in appearance than a polished finish. The words honed, satin, matte and other descriptive terms are used interchangeably to describe a finish that is not as reflective as a highly polished finish. A honed finish can be created using the same specialized abrasive technique as that of polished stone, except that the level of desired polish is achieved sooner, with less polishing. Honed finishes are often requested where slip resistance is desired, however, a honed finish is not a guarantee that the surface will be slip resistant. Some stones are slippery even when honed.

Brushed / Antiqued

If a textured look but a smooth touch is desired, a brushed finish, also known as an antiqued finish, may be a perfect option. This type of finish is achieved using wire wheels and brushes that create thousands of microscopic scratches. The end result is a natural stone finish that looks like it has beautifully and uniformly aged over centuries of time and use. A brushed finish is an excellent choice in a setting where slip resistance and ease of maintenance is desired. Most brushed finishes will be a little more difficult to clean than honed or polished finishes.

Textured / Hammered / Tooled

Unlike smooth honed and polished finishes, textured finishes, also known as hammered or tooled finishes, have varying degrees of roughness, depending on the methods used to fashion the texture. For example, a flame heats the surface of granite to create a flamed finish. With a sandblasted finish, abrasive media is sprayed under high pressure across the surface of the stone. A tool that looks like a meat tenderizing hammer is pounded on stone to create the pockets and ridges of a bush hammered finish. With a cleft finish, the stone is simply split, and the naturally uneven break is the finish. Textured finishes hide imperfections and camouflage minor surface damage like scratches and etching, so they are ideal for areas with excessive traffic. Textured finishes are not ideal for countertops or surfaces that need to be cleaned often, because the uneven surface will snag sponges and cleaning cloths. These finished are most appropriate for exterior stone installations such as sidewalks and pool decks.

Custom

A combination of finishes may be used on a single stone surface to achieve a custom finish. For example, a logo or pattern can be sandblasted onto polished stone by protecting certain polished areas and sandblasting other areas. A similar process might involve applying acid to stone that contains calcium carbonate, causing chemical reactions that will roughen the surface of the stone. A custom finish is a great option for creating a focal point or showcasing a natural stone feature.

Impregnators, Enhancers, and Topical Coatings

There are a variety of sealers, coatings, and enhancers available that can also alter the look of stone. Be sure to consult with your PRO as using them may not always be useful or beneficial, and in some cases will result in problems.

Impregnating Sealers

Contrary to popular belief, impregnating sealers do not give stone a shine or change the texture or appearance of stone in any way, except if an impregnating sealer also happens to be an enhancer. Impregnating sealers are designed solely to fill the pores in stone to inhibit spills from staining.

Enhancers

The colors inherent in some natural stones can be heightened and intensified with enhancers. If you desire stone with a wet look (think how the color of jeans darkens when wet), enhancers will achieve this while also offering different levels of shine. Most enhancers do not inhibit staining unless the enhancer is also an impregnating sealer. Enhancers are often considered permanent, because once they are applied, they are extremely difficult to remove, but enhancers do tend to fade or are slowly removed over time with cleaning.

Topical Coatings

Unlike impregnating sealers that penetrate beneath the surface of the stone and don’t affect the look of the stone at all, sealers that stay on the surface of stone are referred to as topical coatings. Although these coatings protect stone against stains, etching, scratches, and other surface damage, they can be problematic. In general, coatings themselves can be damaged, turn yellow, and attract dirt and contaminants. Many topical sealers on floors look great at first, but once the appearance of the coating diminishes, it must be completely stripped and reapplied. Another consideration is that stone on floors needs to breathe. Coatings can trap moisture, resulting in damage to the stone itself, such as cracking, flaking, and spalling. In some situations a topical coating might be suitable, but you will want to consult with your stone restoration PRO to be sure.

Stone Restoration Technicians Can Change Finishes

When all is said and done, if you are not happy with the finish of existing stone floors, countertops and other surfaces, let’s discuss it. We can evaluate your stone and may be able to alter the appearance more to your liking. We routinely refinish shiny, polished stone surfaces to a honed (matte or satin) finish and vice versa, apply decorative textures, enhance colors, and apply specialty treatments.

3 Tips for Comparing Stone Restoration Bids

Choosing a stone restoration contractor by comparing bids based only on price can be a costly mistake. There are other important factors to consider before you make a decision. Here are three tips for comparing stone restoration bids.

1. Does your contractor understand your particular type of stone?

Although there are similarities between marble, granite, travertine, and other types of stone, there are also differences that require specific restoration processes. Janitorial and cleaning companies may provide valuable services but their technicians are rarely properly trained, qualified, or experienced when it comes to natural stone restoration. Even some stone restoration companies may have little or no experience with your specific type of natural stone. Be sure to ask what your prospective contractor knows about your stone. They may offer the cheapest price, but in the wrong hands, your stone could end up with poor quality results or problems such as dimpled or wavy surfaces.

2. Are there hidden costs not included in the bid?

Basic stone restoration involves honing to remove surface damage and polishing to restore the finish of the stone. Your prospective contractor may not have included other procedures necessary to make your stone look brand new again in the bid. For example, does your stone have deep scratches, chips, or cracks? If the bid only includes honing and polishing, the contractor is not legally obligated to do special repair work. Does your stone need to be sealed? If so, check if sealer application is included in the bid.

3. Will the contractor be able to accommodate your schedule?

Scheduling is important for many people, but especially for business owners and property managers. In order to minimize disruption to the normal routines of employees, guests, and patrons, it’s important to know that your contractor can provide a plan of action that includes a start and finish date, and if necessary, work during the least busy hours or make special accommodations, such as keeping sections of flooring open for traffic while they work. Be sure to communicate your needs and confirm these details before accepting a bid.

Once you’ve taken the time to select contractors and gather bids for your stone restoration project, follow these tips to make an informed decision so that you will be happy with the entire experience, not just the price.


This article is one of a series of articles written and published on behalf of Surface Care PROS Partners.

Why Pool Decks Turn Green and Black

Why Pool Decks Turn Green and Black

What is that green and black stuff growing on my pool deck? This is a question pool owners often ask. This article will help you identify and remove pool deck discoloration, as well as minimize the likelihood of future discoloration.

Biological Growth Types

The majority of unsightly green and black spots on pool decks are the result of biological growths in the form of algae, molds, lichens and mosses, and plants such as ivy and grasses. Let’s take a look at each:

  • Algae is commonly green in color but can also be black, orange, red or yellow. It is easy to identify since it grows in mats, films, and patches on the surface of stone, brick and concrete. Algae is a single-cell plant but lacks roots, leaves, stems and vascular tissue. Most algae, especially the green type, needs moisture and sunlight to grow. However, there are species that will grow in damp, low-light areas.
  • Moss is most commonly green but can also be red. Like algae, it requires sunlight and moisture to grow. It also needs a mineral source often found in soils. Unlike algae, moss has a root structure and a very small leaf structure. It will often grow in grout between stone and masonry.
  • Mold is a fungus, not a plant. It does not require sunlight but does require moisture and an organic food source. Mold is generally black in color but can also be red, orange, brown, or yellow. Limestone is especially susceptible to mold growth, since it contains organic matter that can feed mold.
  • Lichens are comprised of a fungus living in a symbiotic relationship with an algae or a relative of bacteria called cyanobacterium (or both in some instances). They can be red, yellow, red, green, or white. Lichens are identified by crusts or leaf-like structures with defined borders growing away from the surface of the stone or masonry.
  • Ivy, grasses, and higher plants are easily identified by their root systems and large leaf structures. They are often green in color.

Removal of Biological Growth

Regardless of the type of biological growth, removal requires the use of biocide cleaning chemicals, such as peroxide, bleach, or other biocides. Here is a basic cleaning procedure that is recommended to remove these growths. Be sure to carefully read the directions on chemicals and take all necessary precautions. Wear gloves and protective clothing. A mask is recommended, since some mold and algae can emit spores that can be harmful to your respiratory system.

Algae is best removed when it is dry since the spores are more likely to become airborne when wet. Allow the surface to fully dry, or expedite the drying process with a fan. Remove as much algae as possible by scraping or scrubbing with a stiff broom or brush.

A pressure washer can be used to remove the remaining biological growth, but there are a few additional precautions and recommendations:

  1. Do not use high pressure. Test the pressure in a non-conspicuous area to make sure you are not damaging the stone or masonry.
  2. Use hot water, if possible. Hot water will kill some of the biological growth and sanitize the surface.
  3. Use a wide nozzle tip to minimize damage. Keep the tip of the wand at least 12 inches away from the surface.
  4. Bleach or vinegar can be used to clean stubborn growth. Mix the bleach or vinegar. Use one cup of bleach or vinegar with one gallon of water. Test this mixture in a non-conspicuous area to see if it will cause discoloration. Some stone and masonry types can lighten, discolor, or etch with bleach or vinegar.
  5. Apply the bleach or vinegar mixture on the deck and allow it to sit for 15-20 minutes. Do not let it dry. (If it accidentally dries, apply more of this mixture.)
  6. Scrub the area with a nylon brush. Rinse with plenty of clean water. Be careful to avoid nearby plants, since this mixture can kill landscaping plants and grasses.

In lieu of bleach or vinegar, you can use many of the commercial cleaners appropriate for your pool deck surface type. You can find them at most home centers. If your pool deck is natural stone, be sure to use a pH-neutral, stone-safe cleaner. Read the directions carefully.

Spot Removal

If you have just a few spots, you can use 3% hydrogen peroxide. Simply spray the growth with the peroxide, allow it to sit for several minutes, and then rinse with water.

Prevention

Your best defense to keep biological growth at bay is to clean the deck on a regular basis. We can professionally clean your pool deck for the best results. We can also apply sealers and preventive biocides to inhibit new growth.

We can provide specific recommendations regarding cleaners for green and black growth on your pool deck.


This article is one of a series of articles written and published on behalf of Surface Care PROS Partners.

I’m sorry, I think you mythunderstood me

It’s kind of funny what people who should know better will say about common stone failures or issues. Over the past several years, we have heard many stories about the reasons stone will fail, turn color, fade, and so on. Many are comical and most are just plain false. Here’s a sampling you may enjoy…

A Warped Sense of Humor

Many seasoned installers who have tried to install green marble tiles with ordinary thin set or other water-based setting materials have experienced warping problems. Here are two ways we’ve heard them explained.

1. Myth: “Green Marble will warp because it contains living plant material. As water is added to the marble, the plants start to grow and this makes the marble warp.” We nearly fell over laughing, but he wasn’t kidding. He really thought this was the reason.

2. Myth: “Green Marble will curl on the edges because the installer did not put enough setting mortar on the edges. The green marble will have a tendency to lift off the floor where there is no mortar and hence will curl.” While not quite as outrageous as the first explanation, it is still just as wrong.
Truth: The real reason green marble warps is a condition known as hysterisis. Green marble is very sensitive to moisture. When water enters the stone, it causes the marble to release any internal stress, thus causing it to warp.

Home Sweet What?

3. Myth: “Your stone floor needs to be homed!”
Truth: No, this is not a spelling mistake – the word used was “homed.” We have run into several sales people who have called the honing process “homing.” Maybe they also worked with pigeons, but we’ve never heard of homing a floor. The proper term, of course, is “HONE,” which means to abrade a stone.

“Plop, Plop, Fizz, Fizz…”

4. Myth: “Your stone floor has an effervescence problem.”
Truth: The key word here is “effervescence.” Let’s clear this up right now. Efflorescence is the deposit of soluble salts on the surface of the stone that is caused by water that carries the salts from the setting bed of the stone to the surface; it is often deposited as a white powder-like residue on the surface of the stone. Effervescence is what happens when something fizzes. A good example is when you drop a tablet of Alka-Seltzer into a glass of water. The fizzing is referred to as “effervescence.” We’ve never seen a stone effervesce unless someone was pouring acid on it!

5. Myth: “Sealing your stone will help with your efflorescence problem.” Truth: We’ve heard so-called experts instruct people with an efflorescence problem to seal the stone as a remedy. This is wrong. Sealing will only block or reduce the pore size of the stone, which will not only cause more efflorescence, but it could also cause spalling, which is when the stone flakes at the surface.

Are You Cracked?

6. Myth: “That’s not a crack, it’s a fissure!”
Truth: Many fabricators will try to blame cracks that occur in stone installations on natural fissures that occur in the stone. Sometimes they are right and sometimes they are wrong. If you look up the word “fissure” in the dictionary, guess what? A fissure is a crack. The distinction they are trying to make is between fissures, which are naturally occurring as part of the formation of the stone and cracks (more appropriately called “breaks”) caused by external forces on the stone. Of course, the most likely place for a break to occur is on a natural fissure. Consequently, definitions need to be clarified and the stone needs to be examined carefully to determine if natural fissures are at risk of becoming breaks during normal usage.

Would You Like Some Salad With That?

7. Myth: “To remove oil from stone, saturating it with water will force the oil out.” Truth: Since it is true that oil floats on water, you would think this makes sense. But trust us, it doesn’t work. The oil is trapped in the pores of the stone and no amount of water is going to force it out. The best way to remove oil from stone is with a poultice and a degreasing chemical. For specifics and poulticing instructions, see https://surfacecarepros.com/stain-management-app/ .

8. Myth: “Just use some vinegar and water to clean your marble or limestone.” Truth: Generally folks in the stone business know better, however this is often recommended by tile installers. Don’t do it! Vinegar is an acid and will etch calcium-based stone. Marble and limestone are generally the most susceptible, but some types of granite will also be damaged by vinegar.

Stones Can Be So Vein!

9. Myth: “If it’s got veins, it’s marble.” Truth: This is a fib we hear all the time. Many people in the industry believe that if a stone has veins, it must be marble. This is totally false. Veins can also be found in granite and limestone.

You Make Me Sick!

10. Myth: “Granite countertops harbor bacteria and emit harmful radon gas.” Truth: This is absolutely FALSE! NIOSH and the CDC have no reports of granite or any other stone used as a countertop being unsafe. If stone were unsafe or unsanitary, why would it be used in food laboratories or sold as cutting boards? There has been no known proof of any illness caused by using stone as a countertop. And as for the rumors that granite contains harmful radon gas — there is so little radon in granite that you would have to live to be 10,000 years old for it to have an ill effect on you. There is likely more radon coming from the ground and the concrete that your house is built on.