Natural Stone Sealing
Natural stone surfaces like marble, granite, limestone, and travertine add timeless beauty to any home. But when it comes to sealing them, doing it yourself can cause more harm than good. Here’s why professional stone care is essential—and how a qualified PRO can protect your investment.
1. Stone Is Delicate and Unique
Not all natural stone is created equal. Marble is softer than granite, limestone is highly porous, and each type requires specific products and techniques. Using the wrong cleaner or sealer can cause:
- Etching (dull spots)
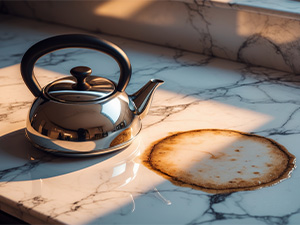
- Staining
- Discoloration
- Surface damage
Professionals assess your stone’s type, condition, and environment before selecting customized solutions, ensuring long-term protection.
2. DIY Products Can Be Deceptive
Many store-bought stone cleaners and sealers promise easy results—but they often contain harsh chemicals or ineffective sealants. Worse, applying the wrong product can lock in stains, make the surface slippery, or even void your stone’s warranty.
A qualified stone restoration contractor uses only high-quality, professional-grade products tested specifically for natural stone surfaces.
3. Proper Sealing Requires Skill
Sealing stone isn’t just “wipe on, wipe off.” It requires precise application techniques to ensure even coverage and proper absorption. Mistakes like over-sealing or under-sealing can:
- Lead to uneven color and blotchy finishes
- Fail to protect against spills and stains
- Create cloudy residue buildup that’s very difficult to remove
Trained technicians know exactly how much sealer to use, how long to let it absorb, and how to buff the surface to a flawless finish.
4. Protect Your Investment
Natural stone is a significant investment—and improper DIY care can diminish its beauty and value. Hiring a professional ensures:
- Longer-lasting protection
- Proper stain resistance
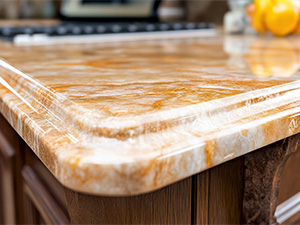
- A beautiful, polished appearance year-round
Professional cleaning and sealing not only enhances your stone’s look but extends its lifespan by years.
Trust the Experts for Your Stone Care
When it comes to your stone surfaces, don’t take chances. Trust your Surface Care PRO stone restoration contractor to clean, seal, and protect your investment the right way. Your stone—and your home—deserve expert care.
By Sharon Koehler. This article is one of a series of Caring For It™ articles written and published on behalf of Surface Care PRO Partners.