Man-Made Quartz vs Natural Stone Countertops
If you have been considering stone countertops, there are many high quality materials on the market today that will improve the value of your home. This article will help you familiarize yourself with the differences between man-made quartz stone and natural stone before making a decision. As you plan a kitchen or bathroom renovation or new construction, it’s important to remember that your countertops and vanity tops will be the surfaces in the room that are both most prominent and most utilized. You’ll want to choose your material wisely, for aesthetic reasons and for intended use.
Quartz
Quartz is an engineered stone made of crushed or powdered quartz crystals, pigments, and a binding material, such as resin. Quartz is sometimes confused with quartzite, which is a popular natural stone. Slabs of quartz are made to look very much like marble, granite, or other types of natural stone, but because they are manufactured using very specific processes, one slab can look exactly like another.
Over the past few decades, engineered stone products, also known as quartz surfaces, such as Cambria, LG Viatera, Vicostone, and countless others have skyrocketed in popularity. This comes as no surprise, since quartz offers many practical advantages over natural stone, including resistance to scratches, chips, cracks, and etch damage.
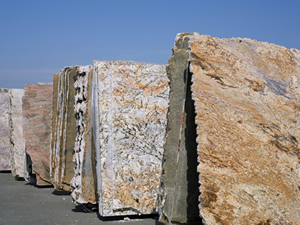
Natural Stone
One would imagine that with all the advantages quartz affords, people might choose it over natural stone every time. But this is not the case. Natural stone has many advantages over quartz. For homeowners who want a unique material, each slab of natural stone, like fingerprints and snowflakes, is truly one of a kind.
Marble, granite, soapstone, and other popular countertop materials are easier to repair than quartz, because they do not contain colored resins. Your professional stone restoration technician can fill in natural stone chips and cracks, remove stains, hone and polish away etches, scratches, and dullness, and completely refinish and renew your surfaces with greater ease and at less expense than quartz.
Sealers
Quartz is nonporous, which means it is inherently resistant to bacteria and viruses, does not stain easily, and does not require sealer. However, there are certain substances that can stain quartz, including paint removers, oil-based soaps and products, permanent dyes and markers, and certain chemicals, such as bleach and degreasers.
Some types of natural stone will not require sealer. Highly polished stone may not even take an impregnating sealer. But, if sealing is recommended, know that sealing represents an inexpensive, preventative measure against stain damage, because it buys you time to wipe up spills before they become stains. Other sealing options for natural stone include color enhancing sealers that enhance the natural colors already present within a stone or sealers for certain types of stone, such as slate or flagstone, that achieve a variety of finishes, from soft matte to a glossy or wet look.
Sustainability
When it comes to sustainability, one could make an argument for or against both quartz and natural stone. Quartz is very abundant, so it does not need to be shipped as far as natural stone. However, the production process for natural stone produces less carbon emissions than that of quartz.
Prices
Prices on quartz and natural stone tops for kitchens and baths vary widely, depending on many factors, from the type of material and finish to the design and edge selections. Quartz is a very dense, uniform material, making it conducive to elaborate designs and edges. Both quartz and natural stone are more expensive than laminate or other budget-friendly materials, but the perks of using a high quality material can far outweigh the cost. If your budget is limited, consider purchasing quartz or natural stone but opting for simpler design and edge selections.
Your countertops and vanity tops should be aesthetically pleasing and ideal for intended use. Whether you choose quartz or natural stone, these are both high quality materials that will improve the value of your home.
This article is one of a series of articles written and published on behalf of Surface Care PROS Partners.